Project 1A: LinkedListDeque61B
Due: Monday, February 5 at 11:59 PM PT
FAQ
Each assignment will have an FAQ linked at the top. You can also access it by adding “/faq” to the end of the URL. The FAQ for Project 1A is located here.
Introduction
In Project 0, you implemented game logic for 2048. In Project 1A and 1B (and some upcoming labs), you will implement your own versions of data structures! In Project 1, you’ll begin by building your own versions of the list-like structure: implementations of a new abstract data type called a Double Ended Queue (deque, pronounced “deck”).
By the end of Project 1A, you will…
- Gain an understanding of the usage of a backing linked list in data structures.
- Have experience with using testing and test-driven development to evaluate the correctness of your own data structures.
For Project 1A, we will provide a significant amount of scaffolding by giving explicit instructions. In Project 1B, you’ll be doing a similar task, but with much less scaffolding.
This section assumes you have watched and fully digested the lectures up till the DLList lecture, Lecture 5.
For this project, you must work alone! Please carefully read the Policy on Collaboration and Cheating to see what this means exactly. In particular, do not look for solutions online.
It should also go without saying that you may not use any of the built-in
java.utildata structures in your implementation! The whole point is to build your own versions! There are a few places where you may use specific data structures outside of tests, and we will clearly say where.
Velocity Limiting
On this project, you will have a max of 4 submission tokens to the autograder, each with a refresh rate of 24 hours. Unlike previous assignments, not all tests will be provided locally, so it is up to you to write tests to verify the correctness of your own code. See the Writing Tests section for more details.
We will not grant extensions for failing to understand the token limiting policy. If you have questions, please ask!
Style
On this project, we will be enforcing style. You must follow the style guide, or you will be penalized on the autograder.
You can and should check your style locally with the CS 61B plugin. We will not remove the velocity limit for failing to check style.
We will not be enforcing style for tests so you can use magic numbers!
Getting the Skeleton Files
Follow the instructions in the
Assignment Workflow guide
to get the skeleton code and open it in IntelliJ. For this project, we will be
working in the proj1a directory.
You see a proj1a directory appear in your repo with the following structure:
proj1a
├── src
│   └── Deque61B.java
└── tests
    ├── LinkedListDeque61BTest.java
    └── PreconditionTest.java
If you get some sort of error, STOP and either figure it out by carefully
reading the git WTFs or seek help at OH
or Ed. You’ll potentially save yourself a lot of trouble vs. guess-and-check
with git commands. If you find yourself trying to use commands recommended by
Google like force push,
don’t.
Don’t use force push, even if a post you found on Stack Overflow says to do it!
You can also watch Professor Hug’s demo about how to get started and this video if you encounter some git issues.
Deque61B: ADT and API
The double ended queue is very similar to the SLList and AList classes that we’ve discussed in class. Here is a definition from the Java standard library.
A linear collection that supports element insertion and removal at both ends. The name deque is short for “double ended queue” and is usually pronounced “deck”. Most
Dequeimplementations place no fixed limits on the number of elements they may contain, but this interface supports capacity-restricted deques as well as those with no fixed size limit.
We don’t need all the methods defined in Java’s Deque, and have defined
our own interface, which can be found in src/Deque61B.java.
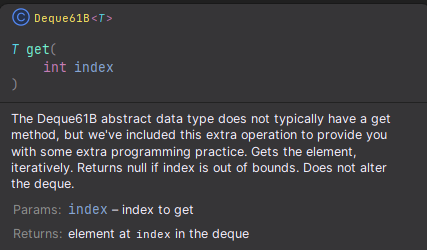
For example, the get method is described as follows, in something called a Javadoc comment:
/** ...
 * @param index index to get
 * @return element at {@code index} in the deque
 */
T get(int index);
Here, @param indicates a parameter to the method, and @return indicates the return value of the method. The @code tag is used to format as code.
If you hover over the method name in IntelliJ, you’ll see a popup that looks like this, which is useful if you want to know what a method does:
Begin by opening the
Deque61B.javafile and reading the documentation in it. We will not repeat information that is in the interface file in the specification – so, it is on you to make sure that you are reading it as you complete the project.
You should not edit Deque61B.java.
It is on you to read the descriptions of the other methods.
Seriously. Do not skip this. You will spend hours confused if you skip this step. Please save yourself the time and stress!
LinkedListDeque61B
Assignment Philosophy
A common beginner mistake is to write a large amount of code and hope that it
all works once you’re finished. This makes life very difficult for a
programmer. Imagine implementing all the methods above, submitting to the
autograder, and getting back a message that says something like “call to get
returned 9, expected 7”. You have no idea if the problem is the get method
itself, or if some other necessary methods are broken.
To help encourage better programming habits, in Project 1A, we’re going to hold your hands through the development process. You are not strictly required to follow the recommended steps, i.e. if you pass the autograder, then you get all the points, but we strongly encourage you to follow the steps outlined in this spec.
For the intended experience, follow these steps in order. If you do something else and ask us for help, we will refer you back to these steps.
Creating the File
Start by creating a file called LinkedListDeque61B. This file should be created
in the proj1a/src directory. To do this, right-click on the src directory,
navigate to “New -> Java Class”, and give it the name LinkedListDeque61B.
We want our LinkedListDeque61B to be able to hold several different types. For
example, a LinkedListDeque61B<String> holds Strings and a
LinkedListDeque61B<Integer> holds Integers. To enable this, you should
edit the declaration of your class so that it reads:
public class LinkedListDeque61B<T>
Recall from lecture that it doesn’t actually matter if we use T or some other
string like LinkedListDeque61B<Glerp>. However, we recommend using <T> for
consistency with other Java code.
We also want to tell Java that every LinkedListDeque61B is a Deque61B, so that
users can write code like Deque61B<String> lld1 = new LinkedListDeque61B<>();.
To enable this, change the declaration of your class so that it reads:
public class LinkedListDeque61B<T> implements Deque61B<T>
However, this creates an error. In order for a LinkedListDeque61B to be a
Deque61B, it needs to implement all the Deque61B methods. However your mouse over
the red squiggle, and click the “implement methods” button when the error
message box pops up. This will autogenerate the method headers for you.
The below GIF goes through these steps:
Lastly, you should create an empty constructor. To do this, add the following code to your file, leaving the constructor blank for now.
public LinkedListDeque61B() {
}
Note: You can also generate the constructor by clicking “Code”, then “Generate” then “Constructor”, though we prefer the typing-the-code-manually approach.
Now you’re ready to get started!
JUnit Tests
LinkedListDeque61BTest
Now open the LinkedListDeque61BTest.java file. You’ll see that every line has a
// preceding it. Let’s remove all of the // comments except last line. To do
this, highlight all the lines of the file that start with //. Then click
“Code” in the top menu bar, then “Comment with Line Comment”. All the lines
should now be uncommented. You can also use Ctrl+/ (Windows / Linux) or
⌘ / / Cmd+/ (Mac).
Now click and run all the tests. You should fail nearly all the tests since you haven’t implemented any methods yet.
Before you can pass these tests, there’s a lot of work you’ll need to do, so we’re going to set aside the tests for now and come back to them much later.
PreconditionTest
In this test file, we’ve provided a few tests that check that your LinkedListDeque61B file to check your code structure for correctness. You do not need to understand these tests, but you should be able to run them.
Writing and Verifying the Constructor
This section assumes you have watched and fully digested the lectures up to and including the
DLListlecture, Lecture 5.
A “topology” is a structure that you can use to represent the linked list. Though there are numerous choices as discussed in lecture, for this project, you are required to implement a circular, doubly-linked topology with a sentinel:
The empty list is represented by a single sentinel
node that points at itself. There is a single instance variable called
sentinel that points at this sentinel.
See this slide.
As mentioned in lecture, though this last approach seems the most complicated at first, it will ultimately lead to the simplest implementation.
Implement the constructor for LinkedListDeque61B to match the appropriate topology.
Along the way you’ll need to create a
Nodeclass and introduce one or more instance variables. This may take you some time to understand fully.
Your nodes should be doubly-linked, and have exactly the
necessary fields (instance variables) for a doubly-linked node. Additionally, you should only have
one node class, and this node class must be an inner, or nested class
inside LinkedListDeque61B.
The design of your
Nodeclass is a strict requirement. If yourNodeclass does not meet the specfication listed above (nested class, with the fields of a doubly linked node) you will not pass the autograder.
When you’re done, set a breakpoint on the first line of addFirstTestBasic.
Run the test in debug mode, and use
the Step Over ( ) feature. Use the
Java Visualizer to verify that your created object matches the expected topology.
) feature. Use the
Java Visualizer to verify that your created object matches the expected topology.
Task: Implement the constructor. Your LinkedListDeque61B` constructor must take 0 arguments. Implement a node class. (You would also probably need some instance variables.)
If
PreconditionTestfails, your implementation is insufficient in some way. The test should give you a hint as to what is wrong. Some common mistakes:
- You may be using an incorrect topology. (If you run into a
NullPointerException, this is likely the case.)- Node might be defined in a separate file.
- Node might be using an incorrect type to store data. Remember that
Deque61Bis generic.LinkedListDeque61Bmight have a constructor that takes additional arguments.- It might have too few or too many fields (instance variables) for a doubly-linked node.
- It might have non-primitive or non-node fields.
The other tests may not work until you complete
toList.
Writing and Verifying addFirst and addLast
addFirst and addLast may not use looping or recursion. A single add
operation must take "constant time," that is, adding an element should take
approximately the same amount of time no matter how large the deque is. This
means that you cannot use loops that iterate through all / most elements of the deque.
Fill in the addFirst and addLast methods. Then, debug
addFirstAndAddLastTest. This test will not pass because you haven’t written
toList yet, but you can use the debugger and visualizer to verify that
your code is working correctly.
Task: Implement
addFirstandaddLast, and verify that they are correct usingaddFirstAndAddLastTestand the Java visualizer.
The tests will not work until you complete the next section,
toList.
Writing and Verifying toList
You may have found it somewhat tedious and unpleasant to use the debugger and
visualizer to verify the correctness of your addFirst and addLast methods.
There is also the problem that such manual verification becomes stale as soon
as you change your code. Imagine that you made some minor but uncertain change
to addLast. To verify that you didn’t break anything you’d have to go back
and do that whole process again. Yuck.
(Also, we have just under 1500 students! No way we’re doing that to grade everyone’s work.)
What we really want are some automated tests. But unfortunately there’s no easy
way to verify correctness of addFirst and addLast if those are the only two
methods we’ve implemented. That is, there’s currently no way to iterate over
our list and get back its values and see that they are correct.
That’s where the toList method comes in. When called, this method returns a
List representation of the Deque61B. For example, if the Deque61B has had
addLast(5), addLast(9), addLast(10), then addFirst(3) called on it,
then the result of toList() should be a List with 3 at the front, then 5,
then 9, then 10. If printed in Java, it’d show up as [3, 5, 9, 10].
Write the toList method. The first line of the method should be something
like List<T> returnList = new ArrayList<>(). This is one location where you
are allowed to use a Java data structure. You can import ArrayList by using IntelliJ’s auto import or copying this statement:
import java.util.ArrayList; // import the ArrayList class
To verify that your toList method is working correctly, you can run the tests
in LinkedListDeque61BTest. If you pass all the tests, you’ve established a firm
foundation upon which to continue working on the project. Woo! If not, use the
debugger and carefully investigate to see what’s wrong with your toList
method. If you get really stuck, go back and verify that your addFirst and
addLast methods are working.
Some later methods might seem easy if you use
toList. You may not calltoListinsideLinkedListDeque61B; there is a test that checks for this.
Task: Implement
toList, and verify that it is correct with the tests inLinkedListDeque61BTest.
The Testing Component
In Project 0, we gave you a full suite of unit tests that you could use to test
your code locally. In this project, you’ll be required to write your own unit
test suite that provides similar coverage. To give a bit of insight about how
this works, we will essentially be taking your test file
(LinkedListDeque61BTest.java) and using it to “test” our staff solution of
LinkedListDeque61B. Using some autograder magic, we’re able to determine which
edge cases your tests are able to hit, thus telling us the “coverage” of your
test suite. So, in order to get a full score on this component, you should try to
think of any and all corner cases for each of the methods!
Our staff solution also only has a constructor that takes 0 arguments, which means that your tests should only use a constructor that takes 0 arguments.
Sharing tests are considered academic misconduct and cheating. Please don’t. This is for you to develop testing skills.
Writing Tests
To write tests, we will use Google’s Truth assertions library. We use this library over JUnit assertions for the following reasons:
- Better failure messages for lists.
- Easier to read and write tests.
- Larger assertions library out of the box.
We often write tests using the Arrange-Act-Assert pattern:
- Arrange the test case, such as instantiating the data structure or filling it with elements.
- Act by performing the behavior you want to test.
- Assert the result of the action in (2).
We will often have multiple “act” and “assert” steps in a single test method to reduce the amount of boilerplate (repeated) code.
You should write your tests in LinkedListDeque61BTest.java.
Note: The tests that you write in this project will be checked for the different "scenarios" they cover. You will need to cover sufficiently many scenarios, including a few edge cases.
Passing the coverage checker does not mean that your tests are perfect! There might still be edge cases that you are missing, as we do not require 100% coverage, and we cannot possibly test every single case. We recommend that you write your own tests to check your code in cases that fail, and not just rely on the coverage checker.
While the coverage checker can check how much you do to the deque, it doesn’t check what you assert about the deque. If you find yourself failing autograder tests that you think you have coverage for, a good next step is to add additional assertions to your own tests. Examples include verifying the result of every call, checking the entire deque between every call, or checking the results of other deque methods.
Truth Assertions
A Truth assertion takes the following format:
assertThat(actual).isEqualTo(expected);
To add a message to the assertion, we can instead use:
assertWithMessage("actual is not expected")
    .that(actual)
    .isEqualTo(expected);
We can use things other than isEqualTo, depending on the type of actual.
For example, if actual is a List, we could do the following to check its
contents without constructing a new List:
assertThat(actualList)
    .containsExactly(0, 1, 2, 3)
    .inOrder();
If we had a List or other reference object, we could use:
assertThat(actualList)
    .containsExactlyElementsIn(expected)  // `expected` is a List
    .inOrder();
Truth has many assertions, including isNull and isNotNull; and
isTrue and isFalse for booleans. IntelliJ’s autocomplete will often give
you suggestions for which assertion you can use.
If you do not assert anything, you will pass your own tests, even if your implementation is incorrect! For example, the following test will pass, even if
addFirstdoes nothing:@Test public void noAssertionTest() { Deque61B<String> lld = new LinkedListDeque61B<>(); lld.addFirst("front"); }You also must remember to use
.isTrue()or.isFalse()when asserting boolean statements. For example, the following test will always pass, even ifisEmptyalways returnsfalse!@Test public void isEmptyTest() { Deque61B<String> lld = new LinkedListDeque61B<>(); assertThat(lld.isEmpty()); }The last line of the above test should instead be
assertThat(lld.isEmpty()).isTrue();.
Example Test
Let’s break down the provided addLastTestBasic:
@Test
/** In this test, we use only one assertThat statement.
    *  Sometimes, the tedious work of adding the extra assertion statements isn't worth it. */
public void addLastTestBasic() {
    Deque61B<String> lld1 = new LinkedListDeque61B<>();

    lld1.addLast("front"); // after this call we expect: ["front"]
    lld1.addLast("middle"); // after this call we expect: ["front", "middle"]
    lld1.addLast("back"); // after this call we expect: ["front", "middle", "back"]
    assertThat(lld1.toList()).containsExactly("front", "middle", "back").inOrder();
}
@Testtells Java that this is method is a test, and should be run when we run tests.- Arrange: We construct a new
Deque61B, and add 3 elements to it usingaddLast. - Act: We call
toListonDeque61B. This implicitly depends on the earlieraddLastcalls. - Assert: We use a Truth assertion to check that the
toListcontains specific elements in a specific order.
The Remaining Methods
All that’s left is to test and implement all the remaining methods. For the rest of this project, we’ll describe our suggested steps at a high level. We strongly encourage you to follow the remaining steps in the order given. In particular, write tests before you implement. This is called “test-driven development,” and helps ensure that you know what your methods are supposed to do before you do them.
isEmpty and size
These two methods must take constant time. That is, the time it takes to for either method to finish execution should not depend on how many elements are in the deque.
Write one or more tests for isEmpty and size. Run them and verify that they
fail. Your test(s) should verify more than one interesting case, such as
checking both an empty and a nonempty list, or checking that the size changes.
For these tests, you can use the isTrue or isFalse methods on your
assertThat statements.
Your tests can range from very fine-grained, e.g. testIsEmpty, testSizeZero,
testSizeOne to very coarse grained, e.g. testSizeAndIsEmpty. It’s up to you
to explore and find what granularity you prefer.
Task: Write tests for the
isEmptyandsizemethods, and check that they fail. Then, implement the methods.
get
Write a test for the get method. Make sure to test the cases where get
receives an invalid argument, e.g. get(28723) when the Deque61B only has 1
item, or a negative index. In these cases get should return null.
get must use iteration.
Task: After you’ve written tests and verified that they fail, implement
get.
getRecursive
Since we’re working with a linked list, it is interesting to write a recursive
get method, getRecursive.
Copy and paste your tests for the get method so that they are the same except
they call getRecursive. (While there is a way to avoid having copy and pasted
tests, though the syntax is not worth introducing – passing around functions
in Java is a bit messy.)
Task: After you’ve copy-pasted tests and verified that they fail, implement
getRecursive.
removeFirst and removeLast
Lastly, write some tests that test the behavior of removeFirst and
removeLast, and again ensure that the tests fail. For these tests you’ll
want to use toList! Use addFirstAndAddLastTest as a guide.
Do not maintain references to items that are no longer in the deque. The amount of memory that your program uses at any given time must be proportional to the number of items. For example, if you add 10,000 items to the deque, and then remove 9,999 items, the resulting memory usage should amount to a deque with 1 item, and not 10,000. Remember that the Java garbage collector will “delete” things for us if and only if there are no pointers to that object.
If Deque61B is empty, removing should return null.
removeFirst and removeLast may not use looping or recursion. Like addFirst and addLast,
these operations must take "constant time." Refer to the section on writing addFirst and addLast
for more information on what this means.
Task: After you’ve written tests and verified that they fail, implement
removeFirstandremoveLast.
Submit to the Autograder
Once you’ve written local tests and passed them, try submitting to the autograder. You may or may not pass everything.
- If you fail any of the coverage tests, it means that there is a case that your local tests did not cover. Here is a list of test cases that you should cover.
- If you fail any of the timing tests, it means that your implementation does not meet the timing constraints described above.
- You will have a token limit of 4 tokens every 24 hours. We will not reinstate tokens for failing to add/commit/push your code, run style, etc.
Scoring
This project, similar to Project 0, is divided into individual components, each of which you must implement completely correctly to receive credit.
- Empty list (5%): Define a valid
Nodeclass and correctly implement the constructor. - Adding (25%): Correctly implement
addFirst,addLast, andtoList. isEmpty,size(5%): Correctly implementisEmptyandsizewith add methods working.get(10%): Correctly implementget.getRecursive(5%): Correctly implementgetRecursive.- Removing (30%): Correctly implement
removeFirstandremoveLast. - Integration (10%): Pass a integration test suite that randomly calls all the methods.
Additionally, there is a test coverage (10%) component. We will run your tests against a staff solution, and check how many scenarios and edge cases are tested. You can receive partial credit for this component. You can find the list of scenarios here.