Lab 04: Git
FAQ
The FAQ for Lab 04 is here.
Introduction
Up until this point, we’ve been using Git and Github to submit assignments, but haven’t talked much beyond what is needed. In this lab assignment, we’ll revisit some previous git commands that we’ve shown as well as introduce new ones, so that you’ll gain more familiarity with Git (and Github). There will be exercises throughout this lab to help reinforce your understanding of Git.
Please don’t skip around in this lab and do not run commands you find online if you get stuck (this could lead to potential issues in the lab). When going through this lab, read through the commands and instructions and make sure you understand them!
Please make sure to pull from the skeleton in your sp24-s*** repository to obtain
the required files. In this lab, we will only have one file, magic_word.txt.
Git vs Github
Before we explore the Git commands, let’s talk about the difference between Git and Github.
Git
Git is a version control system that is free and open-source (this means that the source code is available for use by users and developers). As a version control system, we use Git to help manage different versions of code and track changes made in the source code. This makes it even more useful if there are multiple developers working on one program. Without a version control system, there wouldn’t be much communication between developers and changes to the source code will go unknown to other developers.
For the most part, Git’s data model or representation is based on a linked list. We’ll talk more about this a little later, but whenever we want to save a snapshot of our repository, we commit it (like we’ve been doing up until this point when we want to submit an assignment). These commits are, in a way, chained together. Here’s a visualization of what that looks like below:
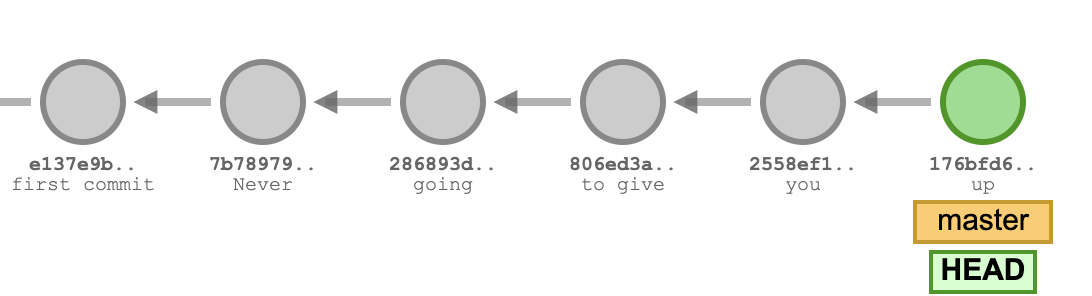
This linked list of commits forms a history of the changes you’ve made. The most recent commit/latest snapshot is the green circle above.
Github
Github is an online hosting service for git repositories. Git repositories are central locations
where any changes made to our files and directories are tracked and managed (this is your sp24-s***
repository). Repositories can be made locally on your computer as well as on Github.
Github allows for easier collaboration with other developers, as you can more easily share code, and also allows us to save our code on a remote server. If you have some code stored locally, you can save it to Github. You’ll then have a copy of your code saved somewhere else in the event that your local code is somehow destroyed. This is why we say to commit often so you save your work and progress on assignments!
Git Commands
In this section, we describe some of the more common Git commands you might end up using. Please keep in mind that this is not comprehensive of all the Git commands that may be available. Let’s begin!
init
The following command can be run in a directory that you want to make into a Git repository:
git init
This initializes a git repository in that directory.
add, commit
When we want to save the changes we’ve made in a git repository, we want to first select what changes should be saved:
git add some_file.txt
If you want to select all changes that have been made, you can run the following shortcut:
git add .
The changes we’ve selected have not actually been saved yet. When we add certain files/changes, this
means we’ve put them into a staging area, which stores information about what will go into our next commit.
To actually save our changes, or take a snapshot of our current repository, we run git commit -m, like below:
git commit -m "We put a commit message here to describe what changes we made."
When we commit any changes, it’s good practice to place a descriptive commit message - this makes it easier to keep track of what changes are made over time as well as make it easier for other developers to understand what you’ve changed.
status
If you want to see what changes have been made, you can run git status in your repository. It might look
a little bit different from below, but it will show what files have been modified. If they are under
“changes not staged for commit”, it means they haven’t been added to the staging area. Once they are
added, those files will show up under “Changes to be committed”.
On branch main
Your branch is up to date with 'origin/main'.

Changes not staged for commit:
  (use "git add <file>..." to update what will be committed)
  (use "git restore <file>..." to discard changes in working directory)
	modified:   proj1a/src/LinkedListDeque61B.java
	modified:   proj1b/src/ArrayDeque61B.java
	modified:   proj1b/tests/ArrayDeque61BTest.java
In this example, git status shows that we’ve modified three files that have not been staged for commit. Once
we git add them, git status will change:
On branch main
Your branch is up to date with 'origin/main'.

Changes to be committed:
  (use "git restore --staged <file>..." to unstage)
	modified:   proj1a/src/LinkedListDeque61B.java
	modified:   proj1b/src/ArrayDeque61B.java
	modified:   proj1b/tests/ArrayDeque61BTest.java
In both cases, “Changes not staged for commit” and “Changes to be committed” are for files that are already tracked or have been saved before in a previous version of your repository. Git will also show untracked files, which have not been saved in a previous version of your repository.
log
Running git log in a git repository will display all the history of our committed history. For example, you
would get something similar to the below:
$ git log

commit 8g955d88159fc8e4504d7220e33fad34f8f2c6bd
Author: Elana Ho <elana@Elana-MacBook-Air.local>
Date:   Tue Feb 7 19:06:48 2016 -0800

    Added common Git problems to lab04.
What this means is that you’re able to view the entire history of all the commits you made. Remember
the message you always add when you commit? It will show up in git log. In this example, the
commit message would be “Added common Git problems to lab04.” That is to say, we ran
git commit -m "Added common Git problems to lab04." when we committed.
Another important thing is what is besides the “commit” heading. It looks like a long string of random characters and numbers, but it represents the commit id. The commit id is a unique id that Git assigned to identify the specific changes that were made in the commit. It is important for the next section.
restore
What if we want to restore changes from a previous version of our program? We can use git restore!
There are a couple ways to do this.
If we want to restore files to the versions in the most recent commit, then we can run git restore
without specifying a commit id:
git restore [path_to_file]
If we want to restore to a specific commit, we can identify that commit’s id and restore the files from that commit.
git restore --source=[commitID] [path_to_file]
Git Exercise (Part 1.1)
Now you’re ready to start using git! Your next task is to work through a small git workflow by setting up a repository and making a couple commits. At the end, you will need to be checked off by filling out the form linked on Beacon.
This is meant to be done on your local computer, but outside your sp24-s***
repository. Make sure you don’t initialize a repository in your sp24-s***!
If you need help with creating directories, creating files, changing directories, etc., refer back to How to Use the Terminal.
- Create a directory called
lab04-checkoff. You can put this directory anywhere on your computer (but not in yoursp24-s***repo). - Move into the
lab04-checkoffdirectory, and initialize a git repository. - Create a file called
61b.txtin any way you’d like. In this text file, add the text “Created 61b.txt”. - Create another file called
61boba.txtin any way you’d like. In this text file, add the text “Created 61boba.txt”. - Begin tracking only
61b.txt, and create a new commit containing just this file, with the following commit message:Add 61b.txt. - Make a modification in
61b.txtby changing the text in the file to: “61b.txt changed to version 2”. - Make another commit, this time containing both
61b.txtand61boba.txt. The commit message should be:Updated 61b.txt and added 61boba.txt. -
Make one more modification to
61b.txtby changing the text in the file to: “61b.txt changed to final version”. Don’t commit this version.At this point, if you were to type in
git statusandgit log, you’d see something similar to the following:
- Using git only, restore
61b.txtto the version in the most recent commit. - Using git only, restore
61b.txtto the version in the first commit.
Be sure to save this repository and directory until you complete the form on Beacon.
Do the steps above, and complete the first google form. There is a second google form to fill out before you get the magic word.
Git Commands Continued
Let’s continue on! In this section, we go a little more in-depth about remote repositories and what branching is.
remote add
Sometimes, we want to be able to pull changes from another repository, specifically one that is hosted on Github. To do so, we can add that repository as a “remote”. For example, in Lab01, we used the following command to add the skeleton repository in our personal repository:
git remote add skeleton https://github.com/Berkeley-CS61B/skeleton-sp24.git
Let’s break this down. When we want to add a remote, we specify the name of the remote, as well as the remote URL.
In this example, the name is skeleton and the url is https://github.com/Berkeley-CS61B/skeleton-sp24.git. We can
then refer to the remote repository with its name when we want to pull or push from it.
So, to add a remote, we can run the following command:
git remote add [remote-name] [remote-url]
You can run git remote -v in your repository to check what remotes have been added.
switch
We haven’t talked a lot about another feature of Git, which is branches! You won’t use it much (or at all!) in this class (except this lab), but it is a useful thing to know.
Most version control systems have some kind of branching system. When we say branching, it means that we “diverge” away from the “main” branch. Branches allow us to keep track of multiple versions of our work at the same time (think of it like alternate dimensions). A reason why we would want to create another branch is if we want to develop another feature of our program, but we still wanted to maintain the current version that we had.
Let’s consider a visualization.
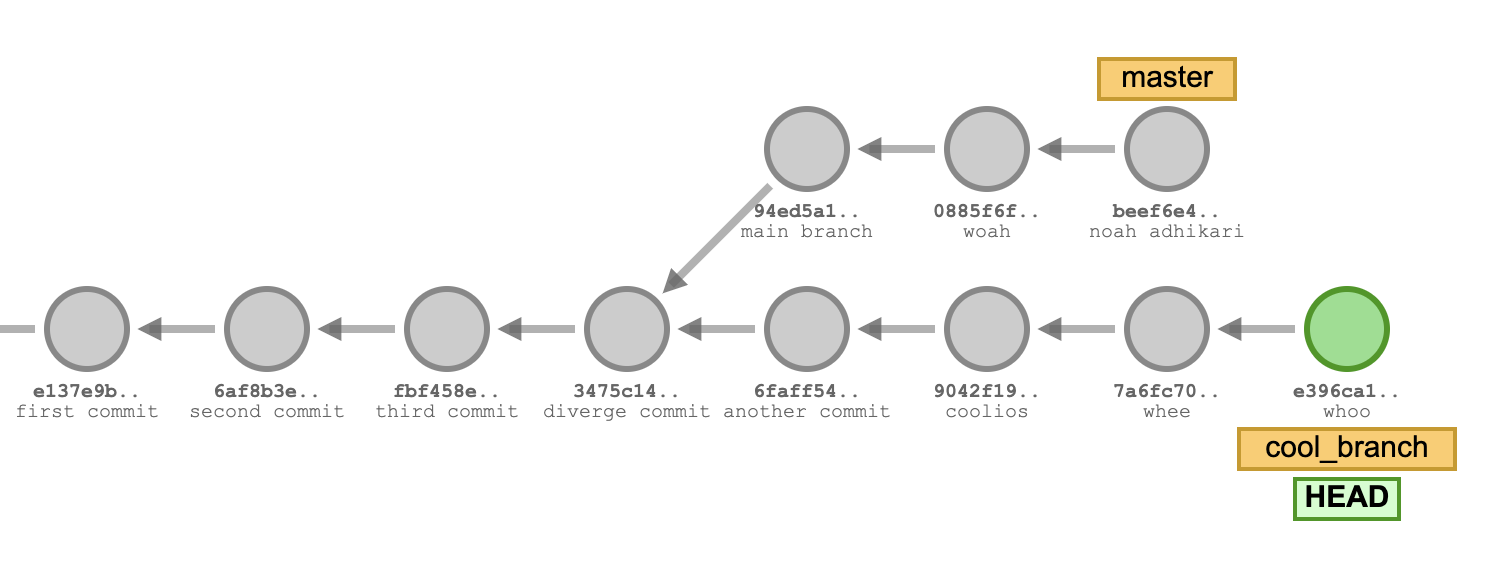
In this image above, there are two branches, master and cool_branch. Notice that we’ve
already made several commits. At some point, we ended up “branching” away from master
(at the commit with the message “diverge commit”) and diverging away from that specific branch.
Now, if we wanted to stop working on our current branch (cool_branch), we can switch back to our
master branch. We do this by running the following command:
git switch [branch-name]
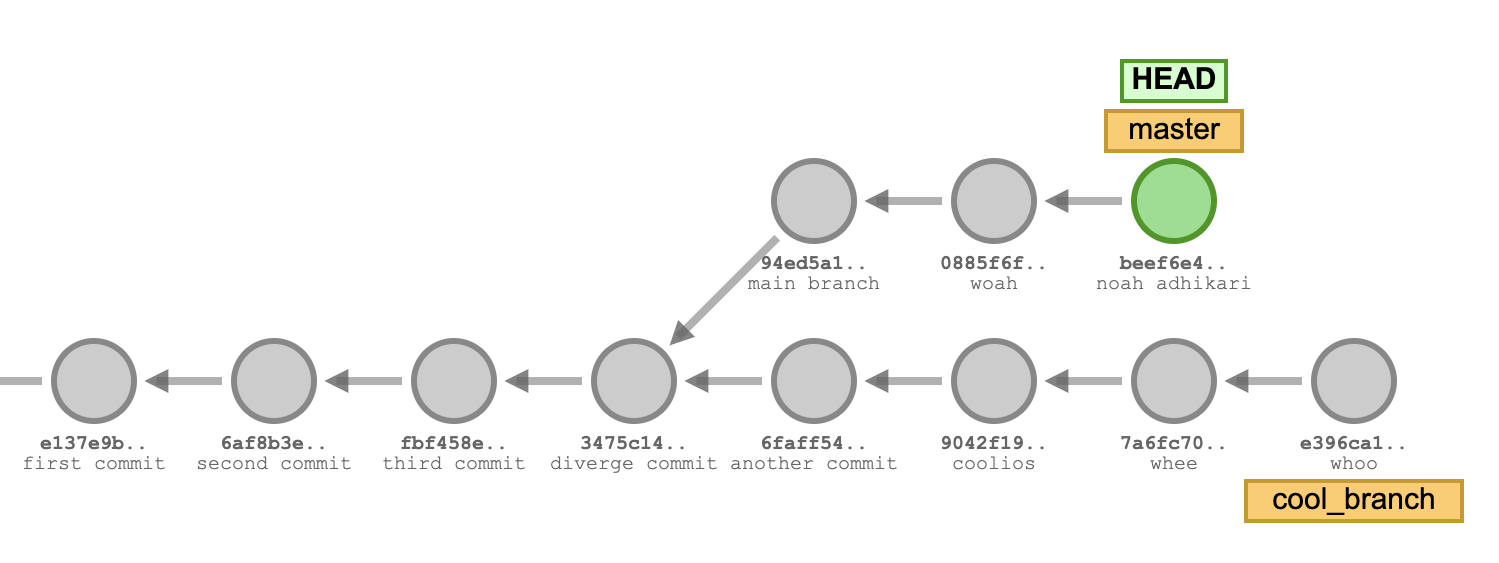
In this example, we would run git switch master. Notice that the HEAD tag is now pointing back to
the latest commit on master.
We won’t cover it here, but feel free to look up how you might create a branch.
restore Revisited
Now that we have an idea of what remotes and branches are, let’s revisit the restore command.
In the earlier section, we talked about using restore to revert back to previous commits
based on the most recent commit or based on a commit id, but we can also use the command
to revert a change back based on a remote repository and a specified branch. This is what
it would look like:
git restore --source=[remote-name]/[branch-name] [file_name]
It would revert the file back based on the contents of the latest commit on the branch of the remote repository.
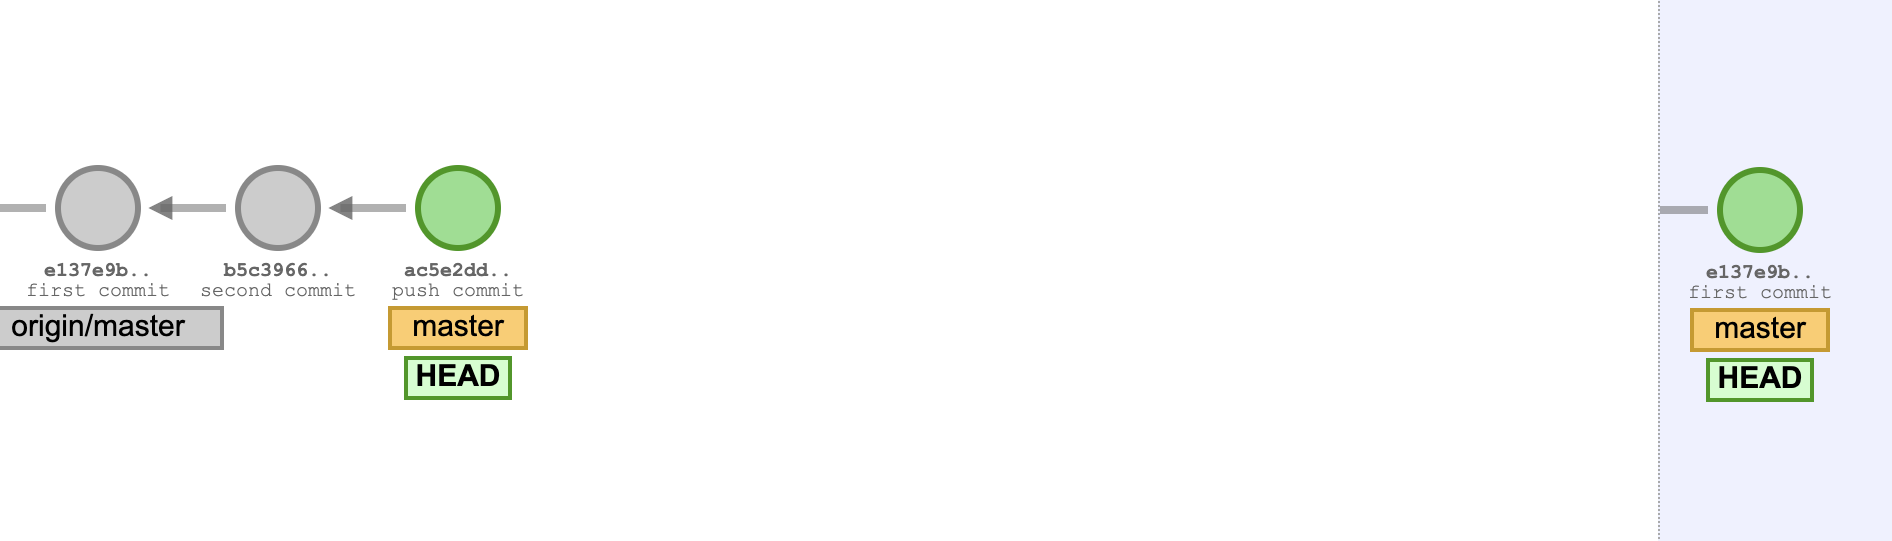
push
If we want to push any commits we made on our local computer to a remote repository, we can use git push:
git push [remote-name] [branch]
In this class, we use git push origin main to push any of our changes from the local repository
to our remote repository. origin is the remote repo that represents our personal repository that’s hosted
on Github and main is the branch that we work off of.
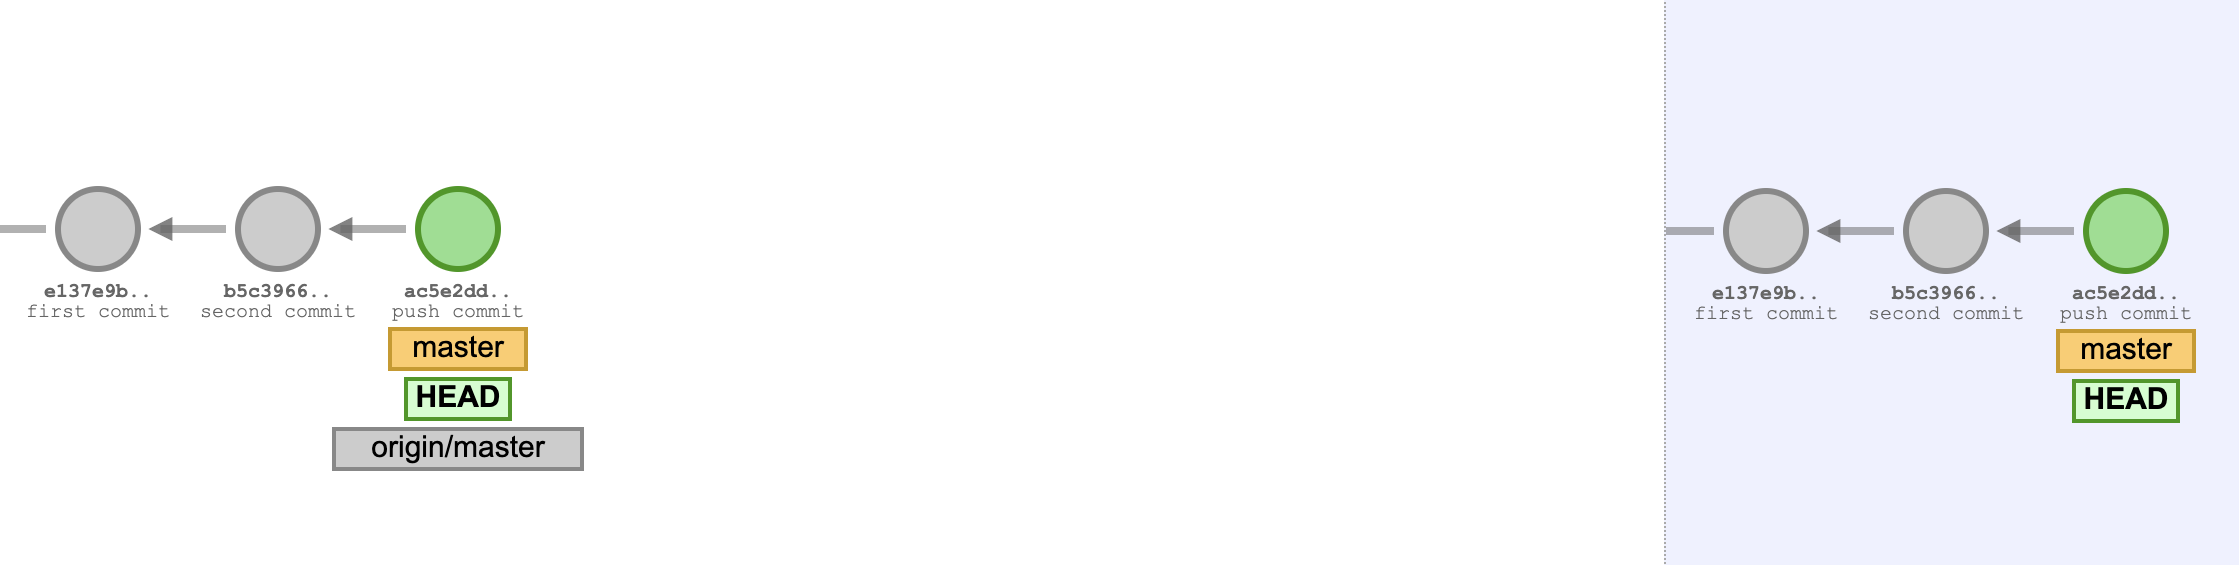
Here’s a visualization of what this looks like with a couple of local commits we haven’t pushed yet. The local repository is on the left, and the remote one is on the right.
After pushing, our commits are now saved in our remote repository:
pull
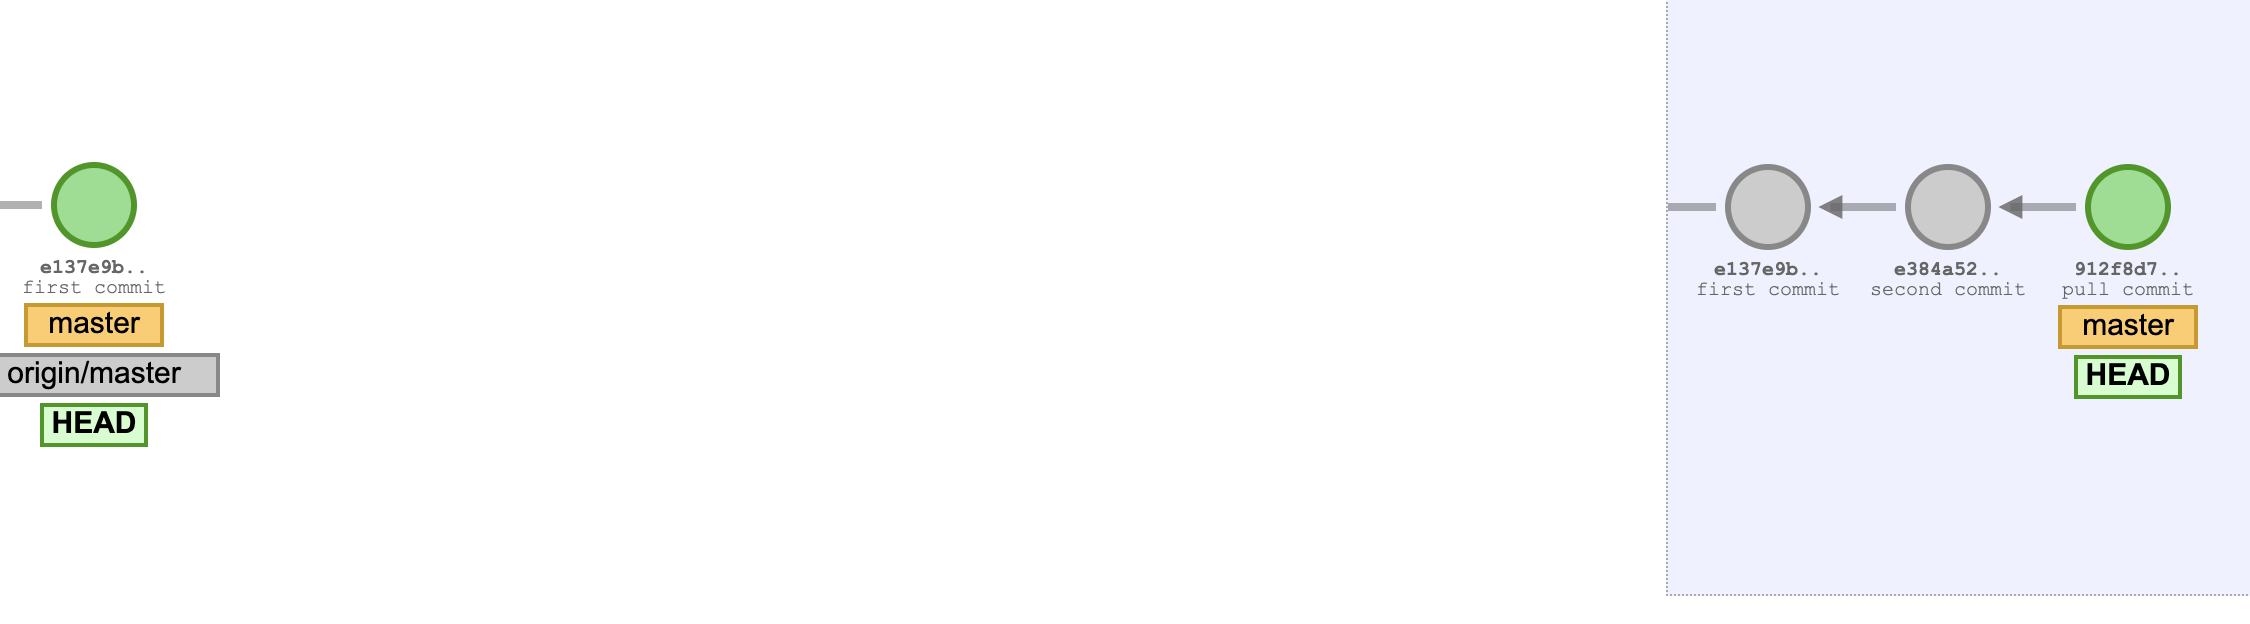
Conversely, if we want to pull any changes from our remote repository to our local one, we can run git pull:
git pull [remote-name] [branch]
We’ve done this before when pulling from the skeleton: git pull skeleton main. Here’s a visualization of
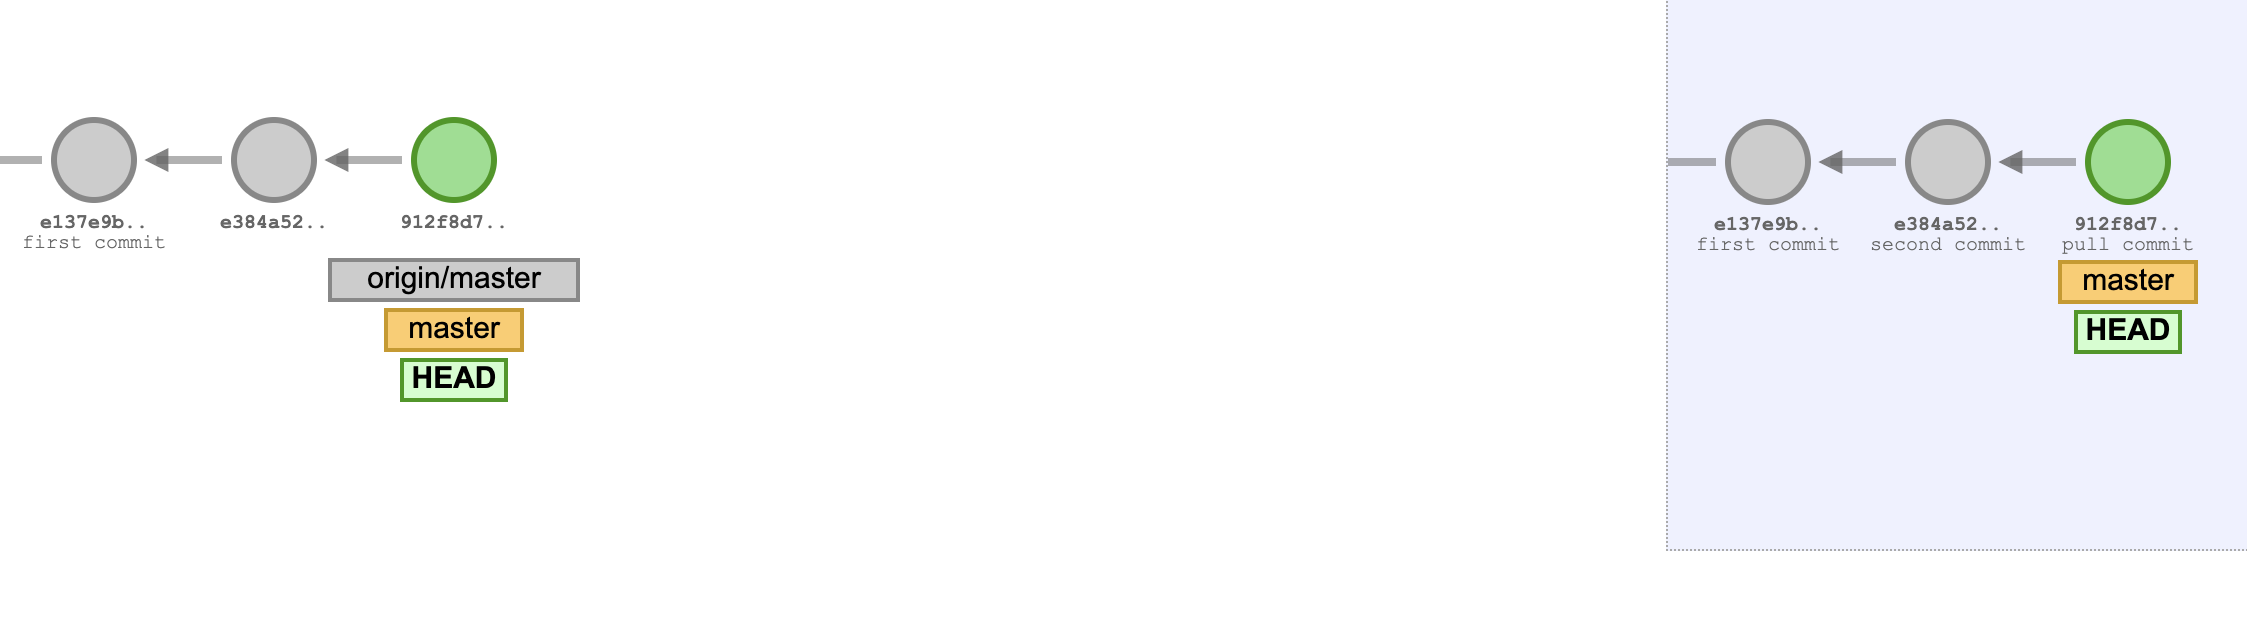
what this looks like with a couple of remote commits we haven’t pulled from yet:
After pulling, our remote commits are now in our local repository:
Common Git Issues
In this section, we’ll cover some common issues you might see with Git. This is not comprehensive of all issues you may see. You can read more about git issues in our guide here.
While this is meant to help diagnose a Git issue and go through the common ways to resolve them, always ask for help if you aren’t too sure!
Fatal: refusing to merge unrelated histories
This usually occurs when someone has changed files in the skeleton code after you
have pulled. To fix, run git pull <remote-repo> main --allow-unrelated-histories --no-rebase.
This may force a merge conflict (more information below).
Merge Conflict
Merge conflict messages can show up like below:
$ git pull origin main
From github.com:Berkeley-CS61B/course-materials-sp16
 * branch            main     -> FETCH_HEAD
Auto-merging proj/proj0/solution/canonical/Planet.java
CONFLICT (content): Merge conflict in proj/proj0/solution/canonical/Planet.java
Automatic merge failed; fix conflicts and then commit the result.
Merge conflicts occur when different modifications have been made to the same file that impact the same lines of code, and thus, cannot coexist. Git will indicate which files have conflicts; to fix them, open the files in IntelliJ and resolve them manually. These conflicts will appear like below in the file:
    public Planet(Planet p) {
<<<<<<< HEAD
        this.xPos = p.xPos;
        this.yPos = p.yPos;
=======
        this.xxPos = p.xxPos;
        this.yyPos = p.yyPos;
>>>>>>> 27ddd0c71515e5cfc7f58a43bcf0e2144c127aed
Everything between <<<<<<< HEAD and ======= is from your local version. Everything between ======= and
27ddd0c71515e5cfc7f58a43bcf0e2144c127aed is from your remote repository. Between these two options,
choose the modifications that you would like to keep. Once you have resolved all conflicts,
add and commit your changes. Run git status to check the state of your repo.
We’ve provided more reading on merge conflicts here and here.
Your branch is ahead of ‘origin/main’ by X commits.
This occurs when the local repo is no longer in sync with its remote counterpart.
If you want to keep the local versions of your files, use git push.
If you want to overwrite your local changes with the versions in the remote repo,
use git reset --hard origin/main.
Git Exercise (Part 1.2)
Just as you did in Part 1.1, navigate to Beacon and complete the second form.
Once you finish both google forms (in Part 1.1 and 1.2) and receive full credit,
you should be able to obtain a magic word. Place this magic word on the
first line of magic_word.txt.
Git Exercise (Part 2)
In this exercise, we’ll have you clone a git repository, and you’ll be using some of the commands you’ve learned to find
the passwords that are hidden away in the repository. Copy and paste the following command to clone your repository, outside
your sp24-s*** repository. The exact location is up to you, as long as it’s not in another repository.
Before running the command, double check that you are not in your personal repository. If you are, a message will show
up preventing you from cloning the repository inside your sp24-s*** repository.
curl -sS https://sp24.datastructur.es/labs/lab04/lab04.sh | bash
Check that a repository called git-exercise-sp24 shows up. If it’s there, cd into it, open up
git-exercise-sp24 in IntelliJ, and you’re ready to continue on with the exercise!
Part 2.1
When you open up the repository, you’ll notice a password.txt file. This is where the password for the first task will
be in. It doesn’t seem to be here, but it might be in a previous commit… See if you can find that commit and revert
back to the commit with some of the commands we’ve learned (you may need to scroll using the arrow keys!).
Find the password for Task 1. When you do, you can store the password on the second line of magic_word.txt file in your
lab04 directory. You will also want to restore your file to the most recent commit before moving on.
Part 2.2
Once you’ve completed Task 1, let’s try to figure out where the second password it is. The repository you cloned
has multiple branches, but the branch called erik might have something we want. Let’s try switching to the branch
and seeing if the password is in there.
Find the password for Task 2. You can verify that it is the password by checking the commit message of the commit
that you are on. When you do, you can store the password on the third line of magic_word.txt file in your
lab04 directory. When you find the password, switch back to the main branch.
Part 2.3
It doesn’t seem like the third password is in this repository, but in another one! The password is in this repository (note that this is not a command, but the ssh url):
git@github.com:Berkeley-CS61B/git-exercise-remote.git
We want to try pulling from it, so first, add this repository as a remote in our git-exercise-sp24 repository. You may
give the remote a name of your choosing. Once it’s added, run the following command (without the brackets around the remote’s
name):
git pull [remote-name] main --allow-unrelated-histories --no-rebase
The reason we add the flags --allow-unrelated-histories and --no-rebase is because our two repositories don’t have any related history, so
we’re going to try to merge these two branches (our local one and the one we’re pulling from).
Do not add the flags if you are not sure if it should be used. If you do use the flag without it being needed, you may
end up putting yourself into an interactive rebase and destroying some of your work. In most, if not all cases of pulling
from the skeleton in your personal repository, this flag should not be added, and running git pull skeleton main is
enough.
Once you’ve pulled, you’ll see Git trying to merge the branches. Go ahead and merge it and the final password should show
up in your IntelliJ. You can store the password on the fourth line of magic_word.txt.
Submission
At this point, you should have four passwords on each line, as specified in the previous exercises. Ensure that they are in the specific order mentioned and that there are no extra spaces at the end. Your magic word text file should look similar to below:
git_exercise_1_password
git_exercise_2.1_password
git_exercise_2.2_password
git_exercise_2.3_password
The passwords should be placed the top 4 lines of your magic_word.txt. When you are ready, please
submit to Gradescope.
If you want to play around with the visualizer which we used to make some of the images in this lab, you can find it here.